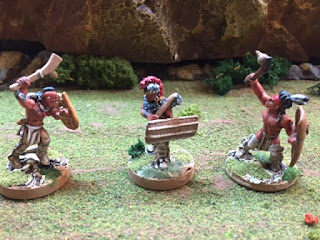
Painting Flint and Feather Figures
 One of our Campaign Playtesters, Mike, recently painted up some of the Flint and Feather figures so that he could use them in the Campaign playtesting. Below is some of the tips and tricks he used when painting the figures. Mike also glued some of the extra accessories onto some of the figures which gives them a new look. Read on and let us know how your painting is going with the figures.
These are the first 28mm figures I've painted in many years. I was a little brush-shy at first, not being used to this scale. However, once I got started things flowed quickly. They are very easy figures to paint. In particular, the castings were very clean with no flash to remove.
I began by reading Bob Murch's notes on how to paint the figures. I took particular notice of his comments regarding selecting a consistent pallet for my war band. Then, I did a Google Image search for "Iroquois war paint" and another for "Iroquois tattoos" to find good examples to model my work on. I then set to work, in this sequence:
- Glued figures to 1"-round bases.
- Undercoated in black gesso mixed 50:50 with matt medium, both
Liquitex products then dry brushed with Folkart "Charcoal" to highlight
details. Also, makes flint spear tips look "flinty".
- Mixed Folkart "Dark Flesh" and "Terracotta" at 4:1 and painted
all flesh. Washed flesh with very thin coat of Galleria "Burnt Umber".
Highlighted flesh with Folkart “Dark Flesh”.
- Wet brushed wood with Folkart "Spice Brown" or "Walnut". Dry brushed wooden armour with Americana "Fawn"
- Painted leather with a one of Folkart "Camel", "Spice Brown", "Terracotta" and Americana "Fawn".
- Wet brushed feathers and added decorative details with Folkart "Raw Linen".
- Painted balls of war clubs and decorative details with Folkart "Terracotta"
- Added war paint using "Terracotta" and a 5:1 blend of "Black"
and "Charcoal", all by Folkart. Also highlighted hair with the
Black/Charcoal mix
- Picked out beadwork and other decorative accents with Folkart "Sea Blue" (a turquoise colour).
- Used an artist's marker with the finest tip to add tattoos and decorations to weapons and shields.
- Textured bases with Lepage "Walnut" Wood Filler.
- Flocked bases with "Italian Blend" bulk spices. Once dry,
stained the flocking with a 40:40:20 blend of water, PVA glue and
Galleria "Burnt Umber".


Lovely work, and good use of colours. I look forward to seeing more!
ReplyDelete